Sure, you can buy Ethernet cables from the store, but where's the fun in that? If you want to make custom cable lengths or crossover cables, or repair a broken connector, why not do it yourself? Here's how.
Before you get started, make sure you have the necessary tools, and decide whether you're going to use Cat 5e or Cat 6 network cables.
What you'll need:
- Unshielded twisted pair (UTP) patch cable
- Modular connector (8P8C plug, aka RJ45)
- Crimping tool
- Cable tester (optional, but recommended)
There are two kinds of Ethernet cables you can make, Straight Through and Crossover.
STRAIGHT THROUGH Ethernet cables are the standard cable used for almost all purposes, and are often called "patch cables". It is highly recommend you duplicate the color order as shown on the left. Note how the green pair is not side-by-side as are all the other pairs. This configuration allows for longer wire runs.
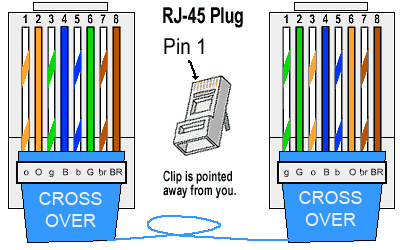
CROSSOVER CABLES - The purpose of a Crossover Ethernet cable is to directly connect one computer to another computer (or device) without going through a router, switch or hub.
Here's how to make a standard cable:
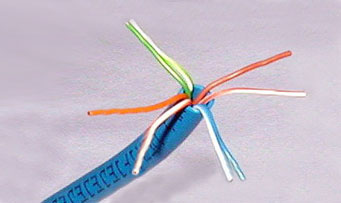
Cut into the plastic sheath about 1 inch (2.5 cm) from the end of the cut cable. The crimping tool has a razor blade that will do the trick with practice.
Unwind and pair the similar colors.
Pinch the wires between your fingers and straighten them out as shown. The color order is important to get correct.
Use scissors to make a straight cut across the 8 wires to shorten them to 1/2 Inch (1.3 cm) from the cut sleeve to the end of the wires.
Carefully push all 8 unstripped colored wires into the connector. Note the position of the blue plastic sleeve. Also note how the wires go all the way to the end.
A view from the top. All the wires are all the way in. There are no short wires.
CRIMPING THE CABLE ... carefully place the connector into the Ethernet Crimper and cinch down on the handles tightly. The copper splicing tabs on the connector will pierce into each of the eight wires. There is also a locking tab that holds the blue plastic sleeve in place for a tight compression fit. When you remove the cable from the crimper, that end is ready to use.
For a standard "Straight Through" cable, repeat all steps and wire color order on the other end of cable. For a cross-over cable, the other end will have a different color order as shown by the crossover picture above.
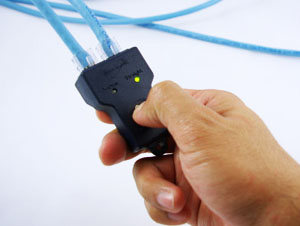
Make sure to test the cables before installing them. An inexpensive Ethernet cable tester does this quite well.
That's it. For crossover cables, simply make one end of the cable a T568A and the other end a T568B. Now you can make Ethernet cables of any length, fix broken connectors, or make yourself a crossover cable. Happycrimping!
STC-Cable has more network ethernet cable, welcome to view our web.
Send your message to us:
Post time: Aug-19-2019


